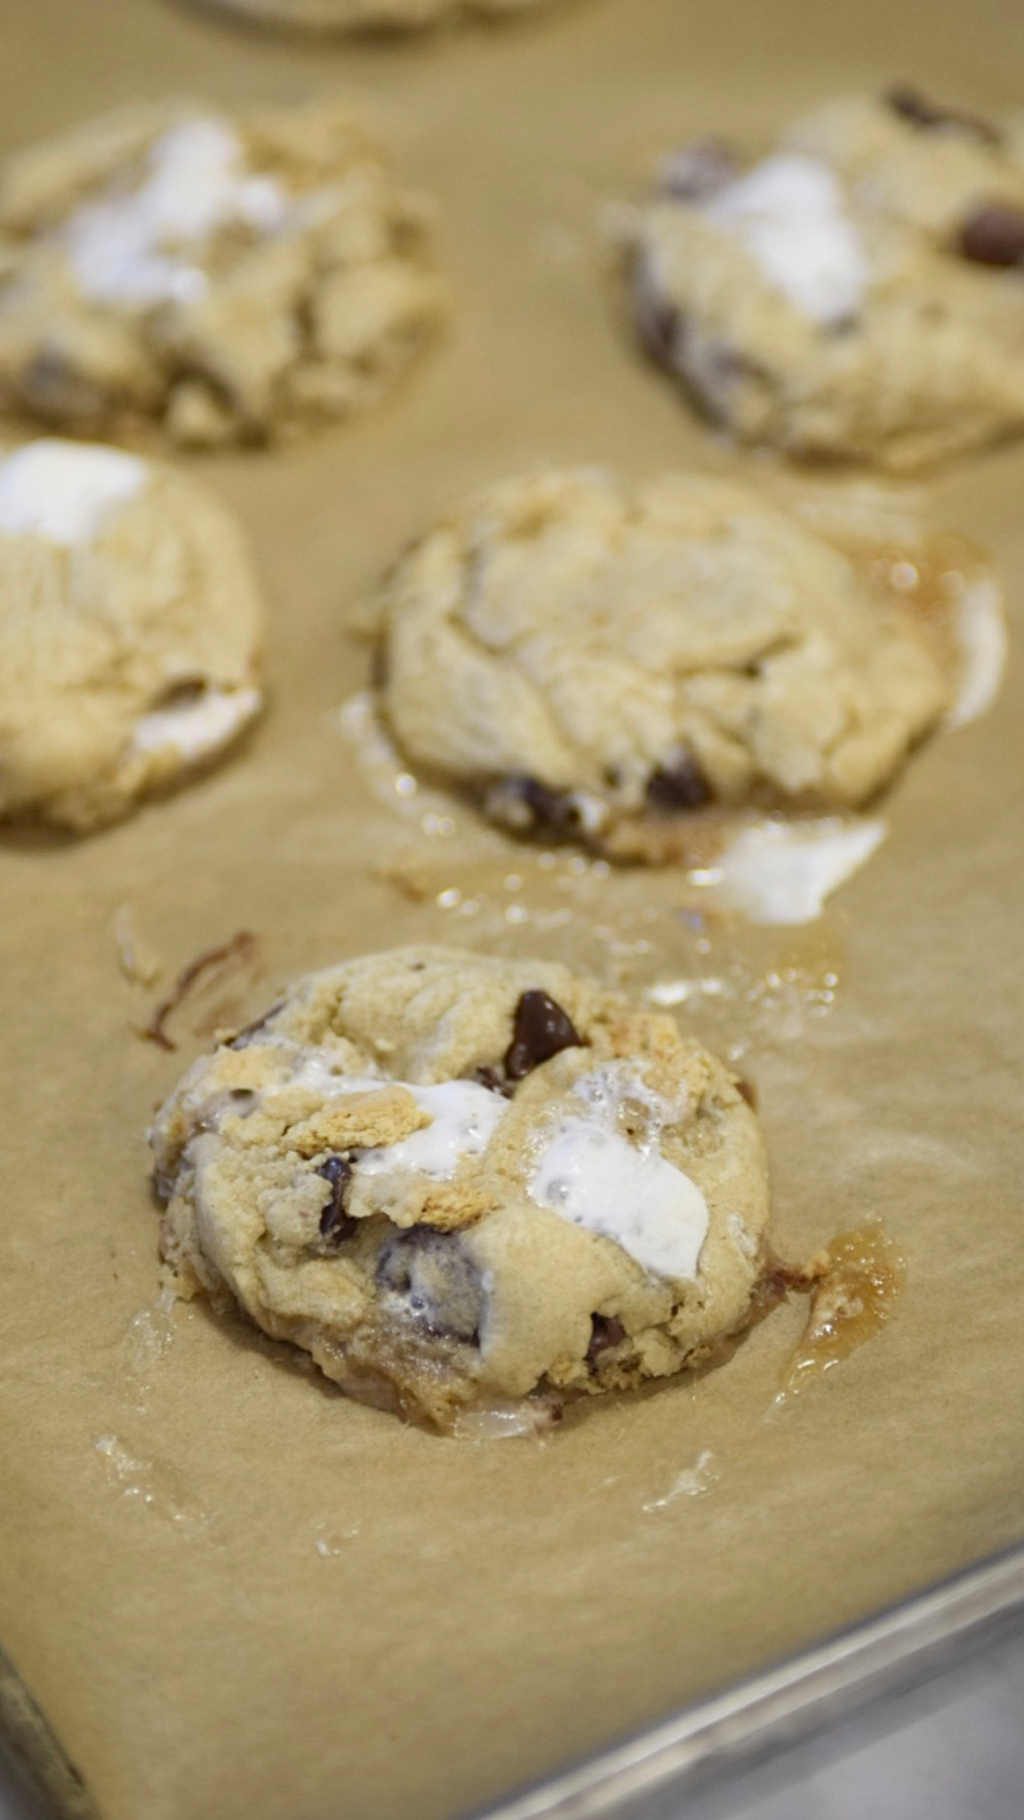
 This recipe is a fun spin off of my famous Chocolate Chip Cookies. You make the cookies as you normally would and then add in the graham crackers and marshmallows, and you’ve got yourself a super delicious, chewy and gooey cookie!!! This recipe is definitely a must try! INGREDIENTS: -2 1/4 cups (280g) all-purpose flour -1 teaspoon baking soda -1 1/2 teaspoons cornstarch -1/2 teaspoon salt -1/4 teaspoon cinnamon -3/4 cup (1.5 sticks) unsalted butter, softened -3/4 cup packed light brown sugar -1/2 cup granulated sugar -1 Lg egg + 1 egg yolk -2 teaspoons pure vanilla extract -1 cup semi-sweet chocolate chips -1/2 cup 350 ct. Milk Chocolate Chips -1/2 cup Crushed Graham Crackers -1 cup Mini Marshmallows INSTRUCTIONS: -Prepare baking sheets with parchment paper or Silicone mats. -Preheat oven to 325°F -In a large bowl, add in the flour, baking soda, cornstarch, salt, and dash of cinnamon. Mix until well combined. -In a mixing bowl, cream the butter and sugars together on medium/high speed for 2 minutes. The mixture should start to get fluffy and soft. You don’t want any clumps of butter. -After you’ve creamed the butter and sugars, slow down the mixer and add in your vanilla extract, egg and egg yolk. Turn up mixer and mix for another 2 minutes on medium speed. -After everything is well combined, slow mixer down to the slowest speed, and add in the dry ingredients. -Add in your chocolate chips, graham crackers and marshmallows before the dry ingredients have fully mixed in. This will help avoid over mixing. -Spoon out your desired size of cookie dough balls, and set 2” apart on your baking sheet with parchment paper or silicone mat. (I use a 3 oz cookie scoop.) -Bake 3 oz cookies for 9-11 minutes. Or until you start to see a tiny bit of golden color on the cookie. Don’t over bake!! These cookies are made to be soft, chewy and gooey. -Let cookies cool for 5-10 minutes and enjoy! 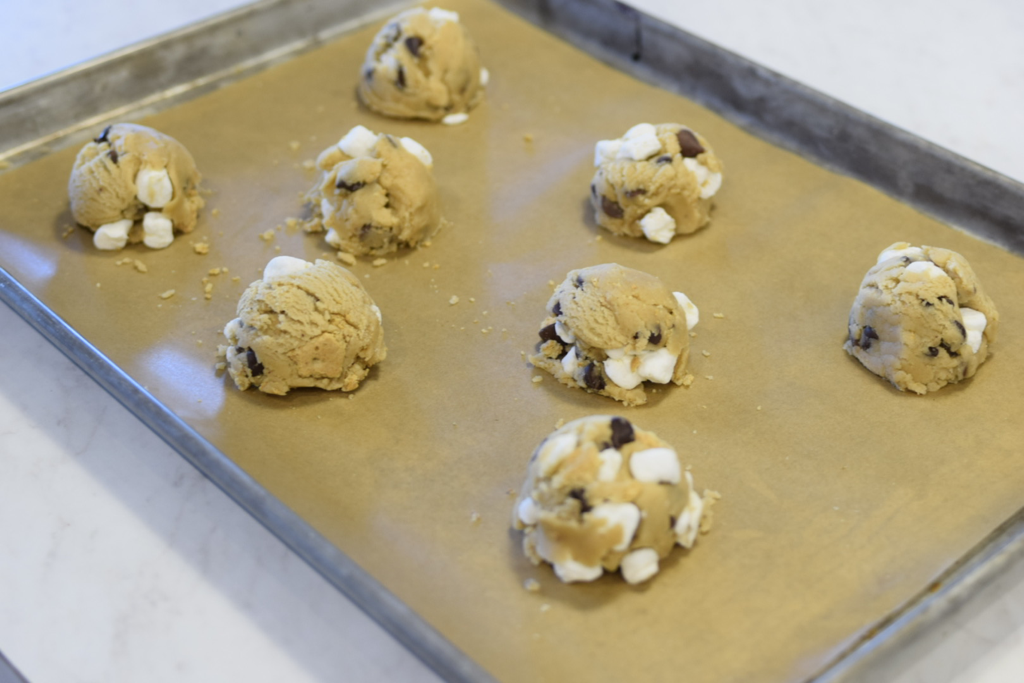
2 Comments
I made this delicious Chocolate Chip Cookie Dough inspired cake the other day, and it was one that I had to share. It was so good and I know that so many of you will love it as well. For this cake, you start with 3X Chocolate Cake layers and Chocolate Chip Cookie Dough Cake layers. The layers are then filled with my Semi-Sweet Chocolate Ganache, Cookie Dough Buttercream and Edible Cookie Dough. (It's delicious!!!) 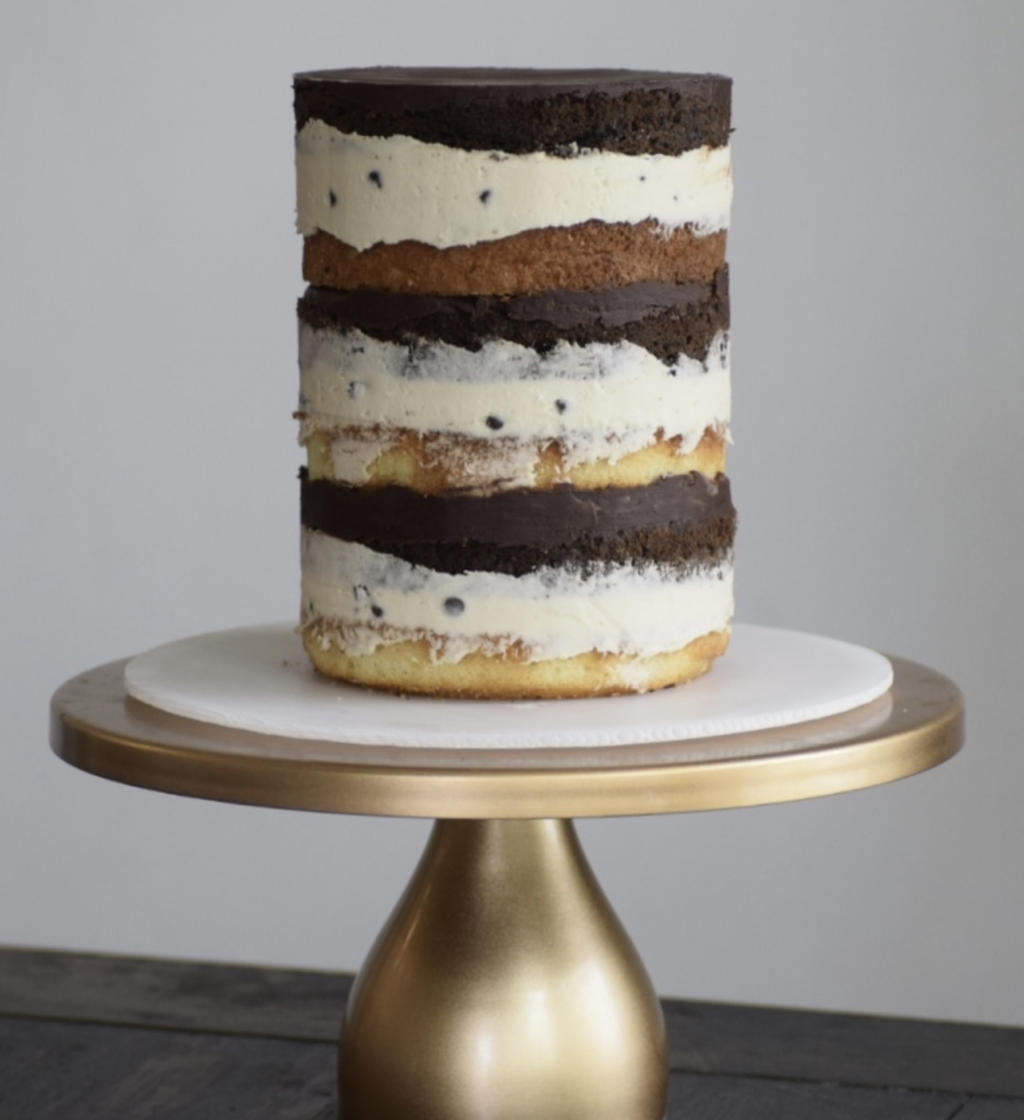 CHOCOLATE CAKE INGREDIENTS:3 Cups Cake Flour 2 1/2 Cups Granulated Sugar 3/4 Cup Dark Cocoa Powder 3 tsp Baking Soda 1 1/4 Baking Powder 1 1/2 tsp Salt 1 1/2 Cup Milk 3/4 Cup Vegetable oil 5 Lg Eggs 1/2 Cup Hot Water 1 1/2 tsp Vanilla CAKE BAKING INSTRUCTIONS:
COOKIE DOUGH CAKE RECIPEINGREDIENTS: 3 Cups Cake Flour (I used Lehi mills Cake flour) 1 1/2 tsp Baking Powder 1 tsp Salt 1 Cup Butter, room temperature 1 1/2 Cup Granulated Sugar 1 1/2 Cup Brown Sugar 4 Eggs 2 Egg Whites 1/2 Cup Vegetable Oil 1 tbsp Vanilla extract 1/3 Cup Greek Vanilla yogurt or Sour Cream 1 Cup Milk 1 1/2 Cup Mini Semi Sweet Chocolate Chips TOOLS NEEDED: Electric Mixer or Large Bowls Whisk Oven Baking spray 3 Cake Pans (6” cake pans or 2 - 8” pans) CAKE BAKING INSTRUCTIONS:
1. Preheat your oven to 325 degrees F. 2. Prepare three 6” round cake pans OR two 8” pans with non-stick spray Spray again. Set aside. (I recommend the “Bakers Spray” or “PAM Baking Spray with flour”.) 3. In a medium sized mixing bowl, whisk together the cake flour, baking powder, and salt. Mix until well combined. Set aside. 4. In the bowl of an electric mixer, fitted with the paddle attachment, cream the butter and the sugars for 3 to 5 minutes on medium-high speed. 5. The mixture should be light and fluffy. Scrape down the sides of the bowl and begin to add the eggs and egg whites on medium speed, scraping down the sides and bottom of the bowl between addition, continue beating on medium-high speed until the texture is smooth and the volume is nearly doubled, about 3 to 5 minutes. Add the vanilla extract and mix until incorporated. 6. Add in vegetable oil. Mix well and incorporate. 7. Add in Greek Vanilla yogurt OR sour cream. (NOT BOTH) Mix well. 8. Slow the mixer down as much as possible, add in 1/2 of the of the dry ingredients. 9. Add 1/2 of the milk. Let mix for 40-60 seconds. 10. Add in the final measurements of flour and milk. Let mix until fully incorporated. 2-3 minutes. The batter should be smooth. 11. Take bowl off of the mixer, and stir in the chocolate chips by hand. 12. Pour cake batter into each of the prepared three 6”cake pans. Or 2 8” pans. Level out all the batter in each pan. 13. Place in over to bake at 325°F for 32-36 minutes. 14. To check doneness, you can touch the top of the cake very lightly. If it stays firm and holds it shaped, almost bounces back, your cake is done. If the cake is still under baked, the center of the cake will start to sink. So make sure that your cake is done before taking it out. 15. You can also insert a toothpick into the center of the cake. If comes out with a few moist crumbs on it. Let cool in the pans for about 15-20 minutes and then remove from cake plans and place cake on cake board. 16. Place cake layers in the freezer for 4-6 hours. **After cold and solid, it’s time to decorate! |
Hi, Im Whitney BergeAka, The Blonde who Bakes, Archives
March 2024
Categories |
 RSS Feed