THE BLONDE WHO BAKES
  • HOME
  • SHOP
  • MENU
  • CATERING
  • CLASSES
  • RECIPES
  • Hi, Im Whitney
  • CONTACT US

Chocolate Peanut Butter Cake

11/16/2023

5 Comments

 
Picture
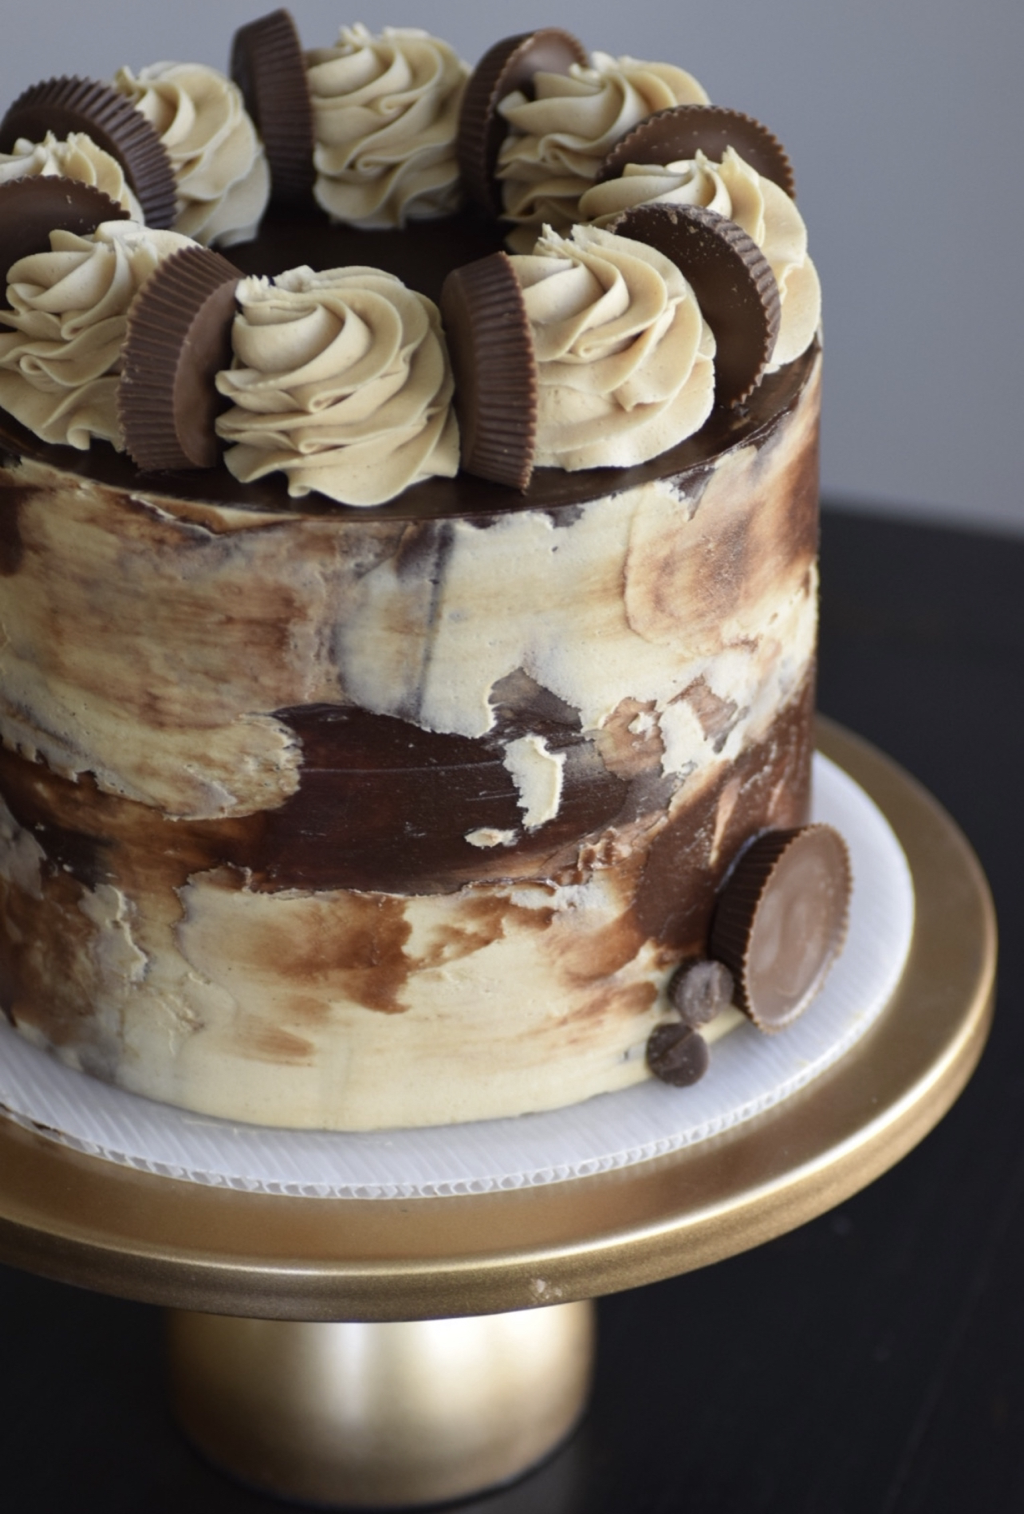
To assemble this cake, I cut my cake layers in half, into 1” layers. I fill the cake layers with my chocolate ganache and peanut butter frosting. I continue this until I have filled all layers.
I then move on to crumb coating my cake with the extra chocolate ganache. Cover the entire surface of the cake.
After I’ve applied the crumb coat, I place the cake in the freezer for 30 minutes to allow the ganache to set up.
Once set up, I apply the peanut butter frosting in random areas of the cake, then scrape it. I then do the same with the chocolate ganache until I get my desired outcome.
After I’m done frosting the cake, I set the cake in the freezer for another 15-20 minutes.
To top the cake I used the Wilton 1M Piping Tip to make rosettes, and set some Reese’s Peanut Butter Cups in between them.
I hope that you love this cake as much as I do. It is absolutely delicious and I cannot wait to hear what you think.
If you end up making the cake, I would love for you to tag me in any photos or videos @theblondewhobakes


​

Chocolate Cake Ingredients:

2 1/2 cups All Purpose Flour
2 1/2 teaspoons of Baking Powder
1/2 teaspoon of Baking Soda
1 cup Cocoa Powder (I love the Ghirardelli Cocoa)
1 teaspoon Salt
1/2 cup Vegetable oil
2 cups Granulated Sugar
3 large Eggs
2 teaspoons Vanilla extract
1 1/2 Cup Milk
1 1/2 Cup Hot Water
1/2 cup of Semisweet Chocolate Chips


Instructions:

  1. Preheat oven to 325 F.
  2. In a stand mixer, whisk together Eggs, Milk, Oil, Water and Vanilla. Mix for 2-3 minutes on low/medium speed.
  3. In a separate bowl, mix the Flour, Sugar, Cocoa, Baking powder, Baking Soda, Salt, and Chocolate Chips. Mix together until everything is incorporated.
  4. Lower the speed on the mixer to the lowest speed, and add in the dry ingredients to the wet ingredients. Mix on medium speed for 2-3 minutes.
  5. Turn off the mixer, and scrape the bowl.
  6. Mix ingredients for another 30-60 seconds.
  7. Prepare 3- 6” cake pans or 2- 8” cake pans with non-stick baking spray.
  8. Divide the batter evenly in the pans. Each pan should be about 1/2 way full. No more than that.
  9. Bake the cakes for 32-38 minutes (for the 6” pans), 45-48 minutes (for the 8” pans). Cakes will be firm to the touch, and will not sink in the center when fully baked. If the cake sinks or wiggles, the cake needs to bake for longer. Add 2-3 minutes at a time until fully baked.
  10. Once fully baked, remove cake pans from the oven, and set aside to cool. KEEP CAKES IN CAKE PANS. Do not remove from pans until cooled completely.


​

Creamy Peanut Butter Frosting Recipe:

INGREDIENTS:
2 C Soft, Unsalted Butter
1 1/2 C Creamy Peanut Butter
3 lbs Powdered Sugar
1 1/2 tsp Vanilla Extract
1 C - 1 1/2 C Heavy Cream


Instructions:


  1. In a stand mixer, use your paddle attachment and cream your butter. Mix on medium/high speed for 2-3 minutes. Or until creamy. (Make sure there are no clumps)
  2. Once creamy, add in peanut butter. Mix until fully incorporated.
  3. Turn mixer down to low speed and add in your vanilla extract
  4. Add in all of your powdered sugar, let mix for about 1 minute.
  5. Scrape down bowl to make sure everything is incorporated.
  6. Add in your heavy cream and mix for about 5 minutes or until creamy. (Add cream AS NEEDED. Don’t use all of it if you don’t need it. Too much cream will make your frosting runny)
  7. Once fully mixed, take off stand mixer and mix your frosting with a wooden spoon and get out any extra air pockets and create a smooth creamy finish.

Chocolate Ganache Recipe

Ingredients:


1 Cup Heavy Cream
1.5 Cups Semi Sweet Chocolate
1 Tsp Vanilla extract

Instructions:


1. Boil the Heavy Cream in a small sauce pan
2. Once boiling, remove from heat.
3. Put your chocolate In a heat safe bowl or glass measuring cup.
4. Pour the hot heavy cream over the chocolate.
5. Mix until fully incorporated. (Should take 3-5 minutes).
5 Comments
Mandy
11/20/2023 06:42:16 pm

Can't wait to try this recipe! I'm making it right now and noticed you said to add water while making the cake part, but there is no water in the ingredients list. I might also be blind, but am I missing something?? Lol

Reply
Mandy
11/20/2023 06:47:51 pm

I also noticed it mentioned Semisweet Chocolate Chips in the ingredients for the cake part but no where in the instructions on when to add them. :)

Reply
Jodi
3/17/2024 05:19:40 am

To add the chocolate chips is in step 3. However mine sunk when I baked them. If I make this cake again, I will either omit them or add them halfway through the baking process.

Reply
Norma Falbo
11/4/2025 08:47:50 am

If you DUST the chocolate chips in just a TINY bit of flour it will keep them distributed throughout the batter instead of sinking to the bottom..

dijital reklam ajansı link
2/11/2026 07:47:44 am

Dijital reklam ajansı; markaların Google, sosyal medya ve diğer online platformlarda hedef kitlesine doğru stratejiyle ulaşmasını sağlar. Reklam yönetimi, içerik üretimi ve performans optimizasyonu süreçlerini profesyonel şekilde yürütür.

Bozygo sosyal medya ajansı olarak, markalara stratejik dijital reklam çözümleri sunuyor; sosyal medya yönetimi ve reklam kampanylarını sonuç odaklı şekilde yönetiyoruz.

Reply


Leave a Reply.

    Hi, Im Whitney Berge

    Aka, The Blonde who Bakes,
    I am a wife and mom of 3, and a self- taught baker. I did not attend any formal culinary training, but I believe that nothing compares to learning as you go.
    Being in the kitchen baking is something that has always been special to me, and I knew that I could use my business knowledge as well as my baking experience to bless others with some delicious desserts, but also teach them that they can do it as well.
    About 15 years ago, I made the decision to not continue in my schooling for Sports Medicine and jumped in to selling my cakes and desserts.
    My clientele grew steadily, and I had some very loyal customers. So I made the decision to open up a brick and mortar bakery. 
    a few years into the bakery, I had my first child. Though it was difficult trying to navigate being a new mom and business owner, I pushed though and continued with my dream. 3 months later, I had a very big surprise that I was pregnant again with baby boy #2. This is when I had to re-evaluate and make the hard decision to close my bakery. Little did I know, that was the best decision I could have ever made. 

    1 year after closing my bakery doors, I wanted to get back to my passion for baking 
    I knew that I needed to change my business strategy because I wanted to be at home with my 2 boys, yet still be able to be Whitney and continue to grow as an entrepreneur. After many long nights of trying to figure out how I could change my business structure yet do what I love.
    I knew that I still wanted to bake desserts for people, but I wanted to focus a lot more of my energy on teaching others how to bake and create delicious and beautiful things. 

    ​And that my friends, is when The Blonde who Bakes came to be. 

    Archives

    January 2026
    June 2025
    February 2025
    November 2024
    March 2024
    February 2024
    December 2023
    November 2023
    October 2023
    September 2023
    May 2023
    April 2023
    March 2023
    January 2023
    October 2022
    March 2022
    October 2021
    September 2021
    August 2021
    July 2021
    March 2021
    February 2021

    Categories

    All
    Cookies

    RSS Feed

THE BLONDE WHO BAKES


Proudly powered by Weebly
  • HOME
  • SHOP
  • MENU
  • CATERING
  • CLASSES
  • RECIPES
  • Hi, Im Whitney
  • CONTACT US